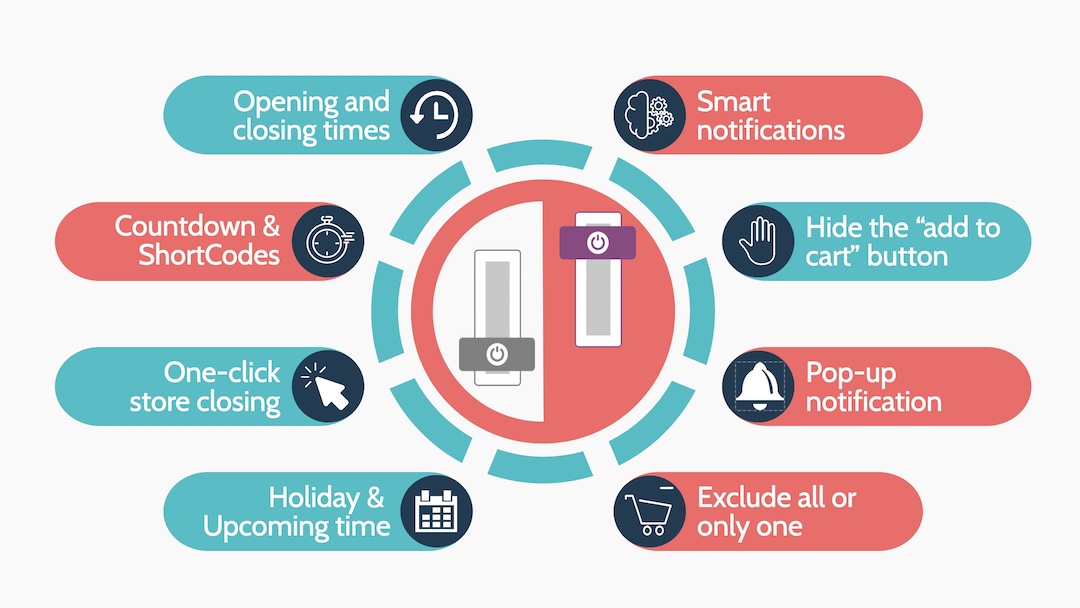
We created Store Closing to help people to close their online shops temporarily for orders. First it was plain and simple, but we continued to improve our code and add some advanced features. Of course, we kept our most powerful thing in this plugin, simplicity. You can still close your store with one-click, even from your WordPress Dashboard or set just daily times and repeat for the whole week. But if you want to explore our plugin’s advanced features, you may need to check this guide, because we really have some shinny powerful stuff.
Installation
Installing WooCommerce Store Closing plugin is a basic process like installing any other plugin. When you bought plugin from CodeCanyon, you’ll download a zip file (storeclosing.zip) containing our plugin’s latest version. Go to your WordPress dashboard, select “Plugins” and “Add New”, click “Upload Plugin” button and select the downloaded zip file (storeclosing.zip). It will install our plugin, you can check the “Installed Plugins” section and find our plugin. If it is not activated by default installation, you can click “Activate” button.
Also, another option is using FTP to install our plugin. Unzip the storeclosing.zip file and copy content (store-closing) to the “wp-content / plugins” folder. You need to Activate plugin before using it. Go to the “Plugins” and “Installed Plugins” section and find our plugin. Click the “Activate” button to start using it.
Note: Please be advised that our Plugin is exclusively downloaded through CodeCanyon, as CapariSoft is an Exclusive Author that solely sells items on Envato.
Additionally, kindly ensure that any previous versions of the Plugin have been uninstalled before proceeding with the installation process.
Where to Find Plugin Settings
When you successfully install and activate the plugin. You will find a new menu called “Store Closing” under the WooCommerce section. By default, WooCommerce Store Closing opens with “Basic Mode”, you will see “Daily opening and closing hours”, “General Notification Message” and “Manual Closing” buttons.
Basic Mode Options
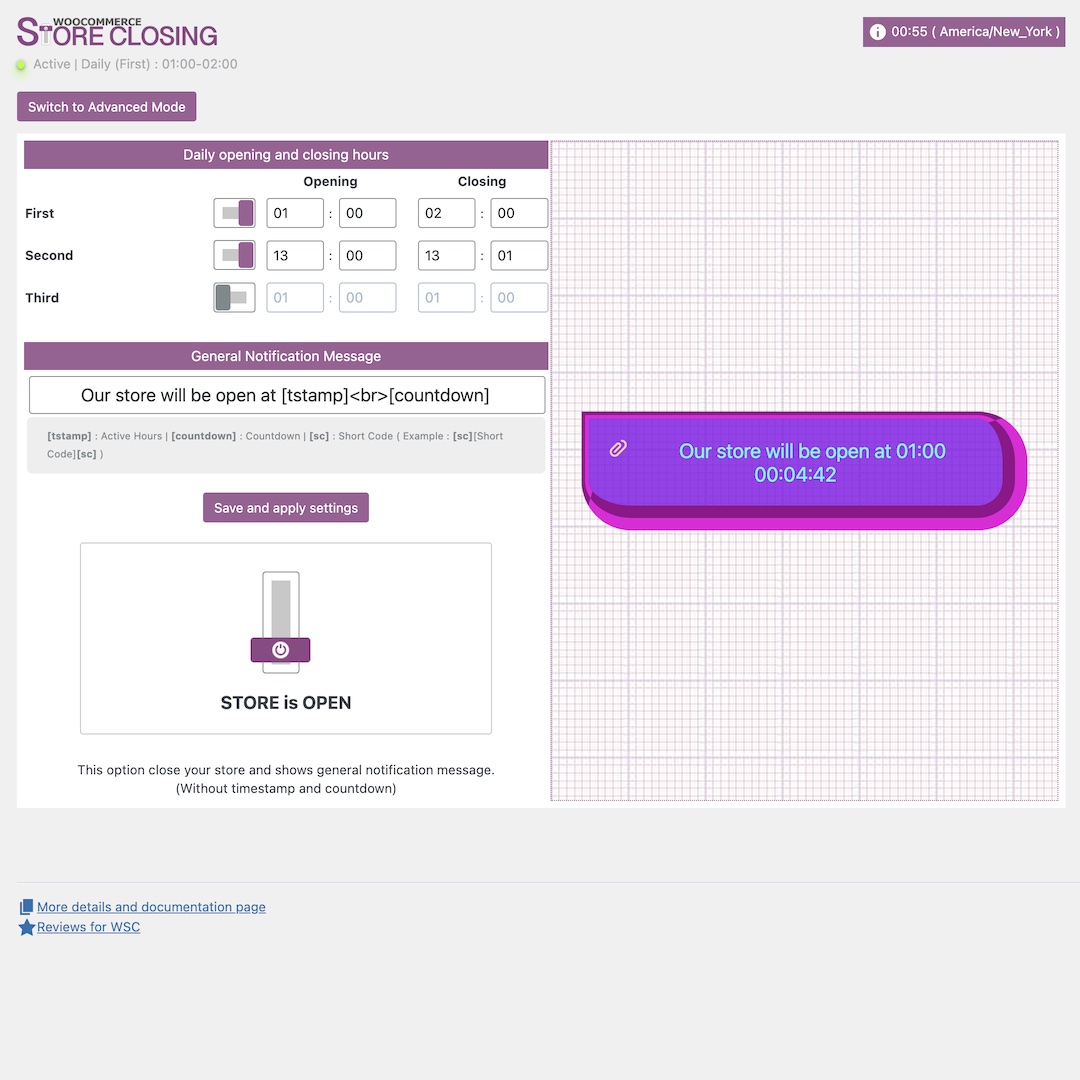
Store status indicator
Active shop time (taking from WordPress settings)
Daily opening and closing times
General notification message
Smart tags
Manual Close
Notification message preview
Daily opening and closing hours
This is the setting where you can specify opening and closing times for your store. You can set up to three different times for daily and this setting will repeat for whole week. You don’t need to use all three times; you can activate only one and set your opening and closing times. When this setting is active, you will see a green light with “Active” sign in admin panel, right under the “WooCommerce Store Closing” logo. This indicates that your store is closed by daily setting.
General Notification Message
This is where you can specify a message to show your customers why your store is closed. In basic mode it is simple, you can write a text and click “save and apply settings”. In this text area you can use some pre-made shortcodes. [tstamp] is to show “Active Hours”, [countdown] is for showing a countdown for opening time, also you can use shortcodes between the [sc] tags, for example “[sc]shortcode[sc]”.
You can see how it looks on the right side, you need to save and apply settings to see active messages.
Manual Close Button
Manual Closing is working with one-click, it is fast and simple. You don’t even need to save and apply this setting, when you trigger this button and see message, it activates directly. “Store is Open” indicates that manual closing is not active, “Store Closed” means your store is closed manually. When you close your store manually, your general notification message will appear on the website, but countdown and tstamp won’t be active.
This is the main setting that overrides every other setting. When this is activated, your store will be closed and won’t check any daily or upcoming settings. So, if you want to use any other settings, make sure that your store is not closed manually. We suggest using this button for emergency and temporary closing situations.
Advanced Mode Options
Auto Setup
We created some templates to make store closing easy. When you click and select any settings, it will fill daily area automatically. You can also choose one auto setting and change timings for your preference. By default, we have nine different templates, you may start with whichever is close to your opening and closing times.
Daily
We have very detailed and advanced daily closing feature. You can open and close your store up to three times for each day and specify different times for different days. When you click Daily tab, you will see first and second areas, you can also see third area by clicking “show” button next to third name. (Hide and show on second and third settings opens and close these areas)
In the first area, you can specify opening and closing times, also add a message for this setting, for example “we’ll be back”, also you can see a timeline which shows you when your store is open or close. If you are doing Siesta, you can close your store second and third time in same day. Once you complete all areas and activate each day, daily will start working and it will repeat each week.
Quick Tips About Daily
- Always check manual closing first, it must be open, otherwise plugin won’t check your daily settings.
- Make sure to check timeline area for each day to understand when your store is open or close.
- Try to start with auto setup, it will make it easy to understand how plugin and opening closing timings are working.
- Our plugin doesn’t have a separate time zone setting. It syncs with WordPress general time setting. You can see at the above right area, make sure that your website time zone configured properly.
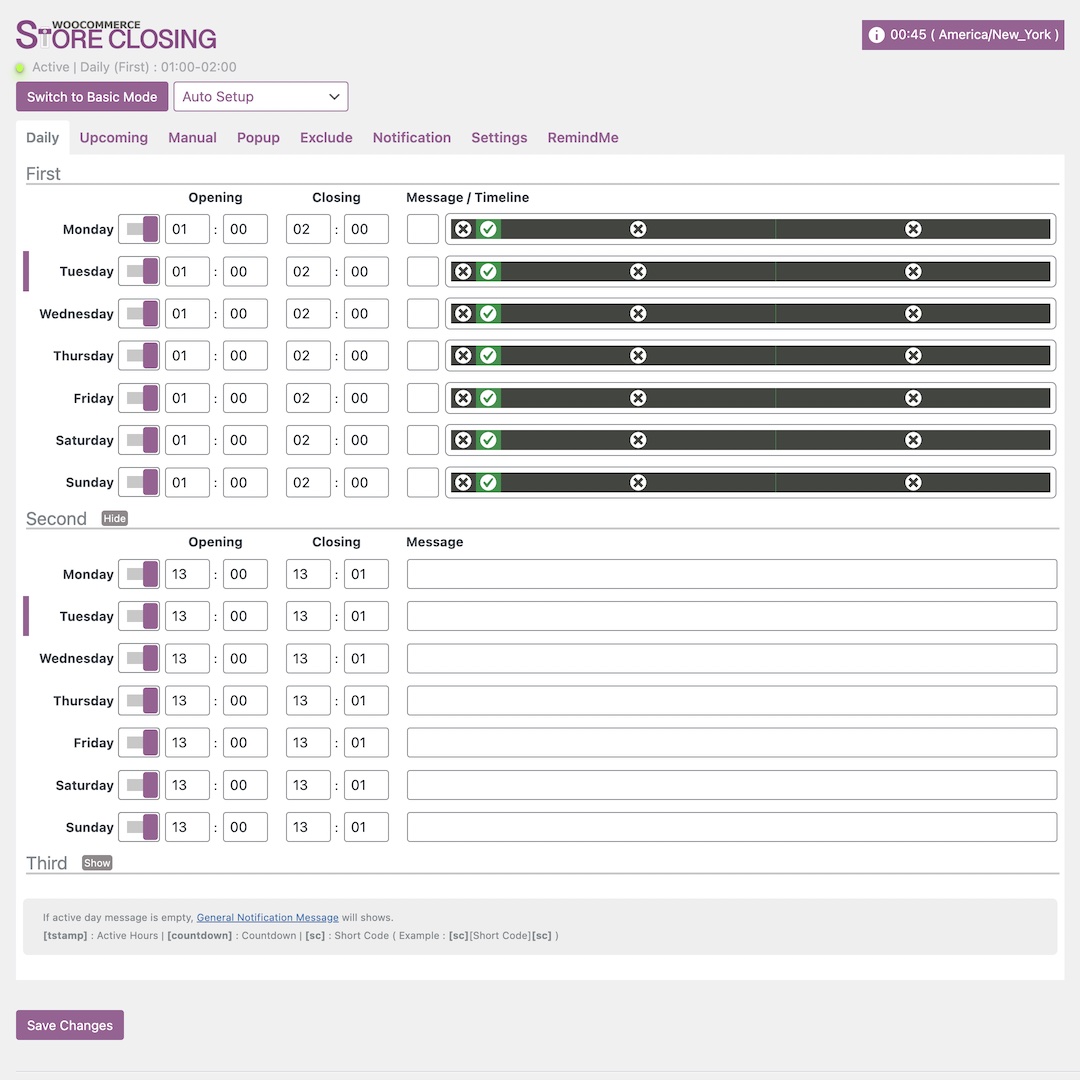
There is a smart indicator on the top of the settings. You can see whether your store is open or closed, also which setting is active.
There is a Basic and Advanced mode. Basic hides lots of advanced settings and only shows easy ones to close or open your store quickly. The advanced mode shows a lot of powerful options, including pop-up, exclude, notifications and custom CSS for appearance.
Auto setup feature with lots of new pre-made settings. This will make your setup a lot easier and great for first-time users. With one click you can do all settings and arrange them for your needs.
You can set three different times for each day, and all of these are in one tab. It is easy to configure, all you need to set one week’s opening and closing times. It will repeat each week.
There are some smart tags that you can use in notifications. With these tags you can show active hours, a countdown, or a ShortCode (created from your theme or other plugins) in the notification area.
The Business Plan feature enables you to see your opening and closing plan.
Upcoming
Upcoming is an advanced feature which allows you to create your business plan at once. You can set opening and closing times for upcoming days. It shows as only one but when you activate a “new upcoming plan”, set times, and save settings, it will be added to database, and you can create new one after. To create a new upcoming plan, you need to set closing time, a notification message and opening time. Also, there is a “show message” section, this allows you to warn your customers for upcoming store close. For example, if you set an upcoming closing time for Friday, you can show this message as warning starting from Monday.
Quick Tips About Upcoming
- Your store is open, and this setting will close it, so closing time comes first.
- Check manual closing, it overrides this setting so it must be open.
- Setting all holidays once a year is good in practice but check your business plan time to time for updates.
- Use “show message” area to notify your customers, it may catch some early sales.
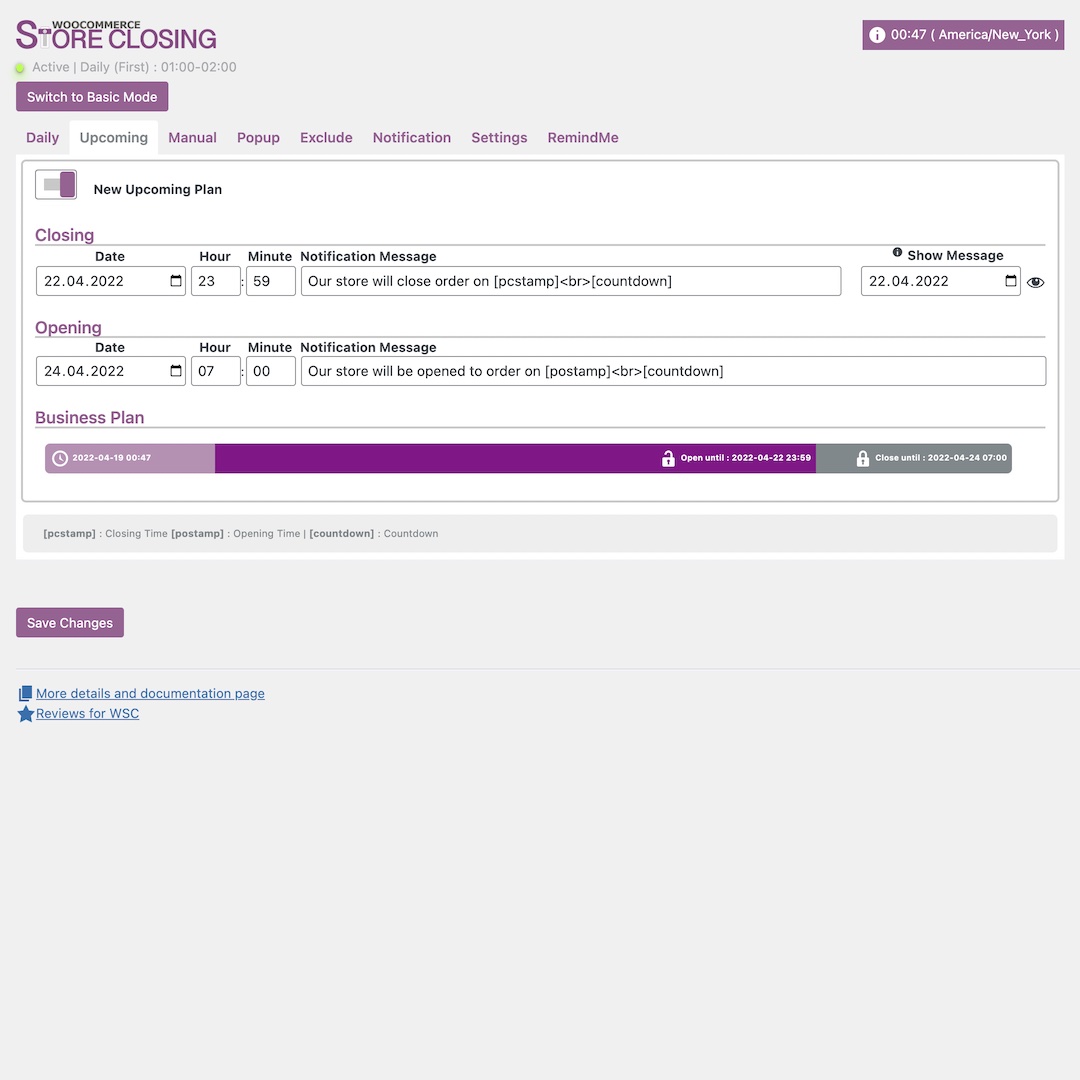
You can set unlimited opening and closing time for future dates. It is a powerful feature that enables you to set your holiday times before it gets close. This way you can do all your plans for the new year and set your store opening and closing dates.
Smart tags in the daily also can be used for Upcoming notifications. You can set a countdown, show active hours, or use a short code in the notification area.
There is a setting to show specific notifications before the upcoming closing time. Which is great for informing your customers before the store closed.
Customized notifications for upcoming dates. You can set some specific messages for holidays, like Ramadan Mubarak, Merry Christmas, etc.
Manual Tab
Manual Closing is working with one-click, it is fast and simple. You don’t even need to save and apply this setting, when you trigger this button and see a message, it activates directly. “Store is Open” indicates that manual closing is not active, “Store Closed” means your store is closed manually. When you close your store manually, your general notification message will appear on the website, but countdown and tstamp won’t be active.
This is the main setting that overrides every other setting. When this is activated, your store will be closed and won’t check any daily or upcoming settings. So, if you want to use any other settings, make sure that your store is not closed manually. We suggest using this button for emergency and temporary closing situations. You can use manual closing even from your WordPress Dashboard. Both basic and advanced modes have this option, there is no difference between them.
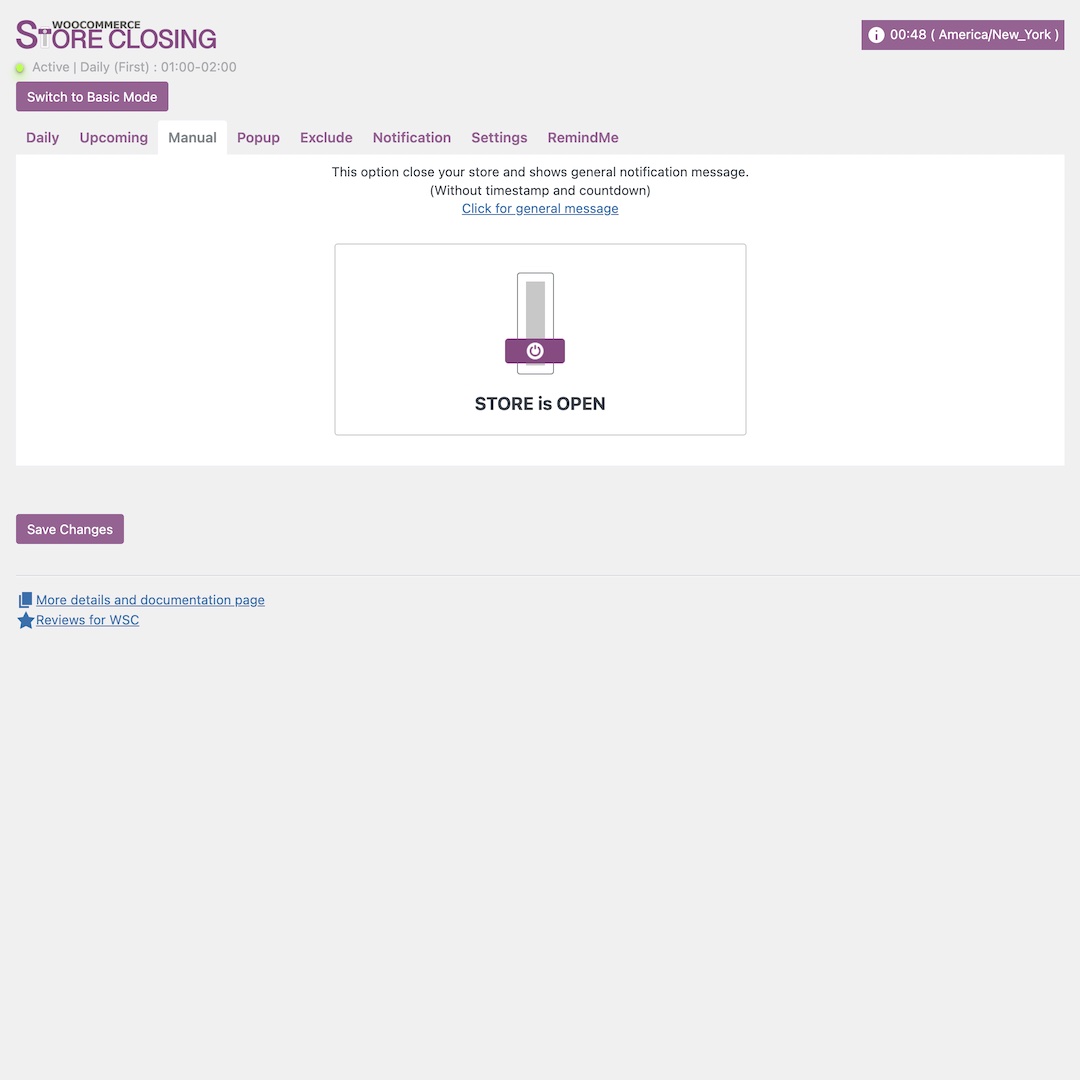
“One-click close” is a great feature to close your store immediately. All you need to do is click the close symbol; you don’t even need to click save settings. Your store will be closed until you open it back.
“Manual closing” feature has the highest priority. This setting overrides all your other settings like daily or upcoming.
Popup
We have a pop-up feature to notify your customers. You may need to notify them right away when they enter your website, all you need to do is activate the pop-up feature. There are lots of customization options. “Show in Area” is the setting where you can select where your pop-up will be shown, top or bottom of the page. “Close Button” activates an X sign to manually close the pop-up, “Closing Time (sec)” is the setting for automatically closing a pop-up, if you set 5 seconds here, it will be closed after 5 seconds.
You can specify background color and transparency, when you save your settings, you’ll see at the right side as a preview. “Cookie” option is where you need to pay attention a little bit more. When you activate this setting, we will create a cookie which stores time, and if you set it here for 7 days, it won’t be shown again for 7 days. You can specify days, hours, minutes, and seconds for this setting.
“Exclude Page” option allows you not to show any pop-up in excluded pages. You can click pages you want and save changes.
Quick Tips About Pages
- When you are doing a pop-up test on your website, make sure that cookie time is set to 5 seconds or less. If you activate it and have like 2 days here, you can’t see the differences in your tests.
- You can use exclude for pages like cart and checkout cause mostly customers will see your notification here and it will show as double.
- Always check how it looks before set and go.
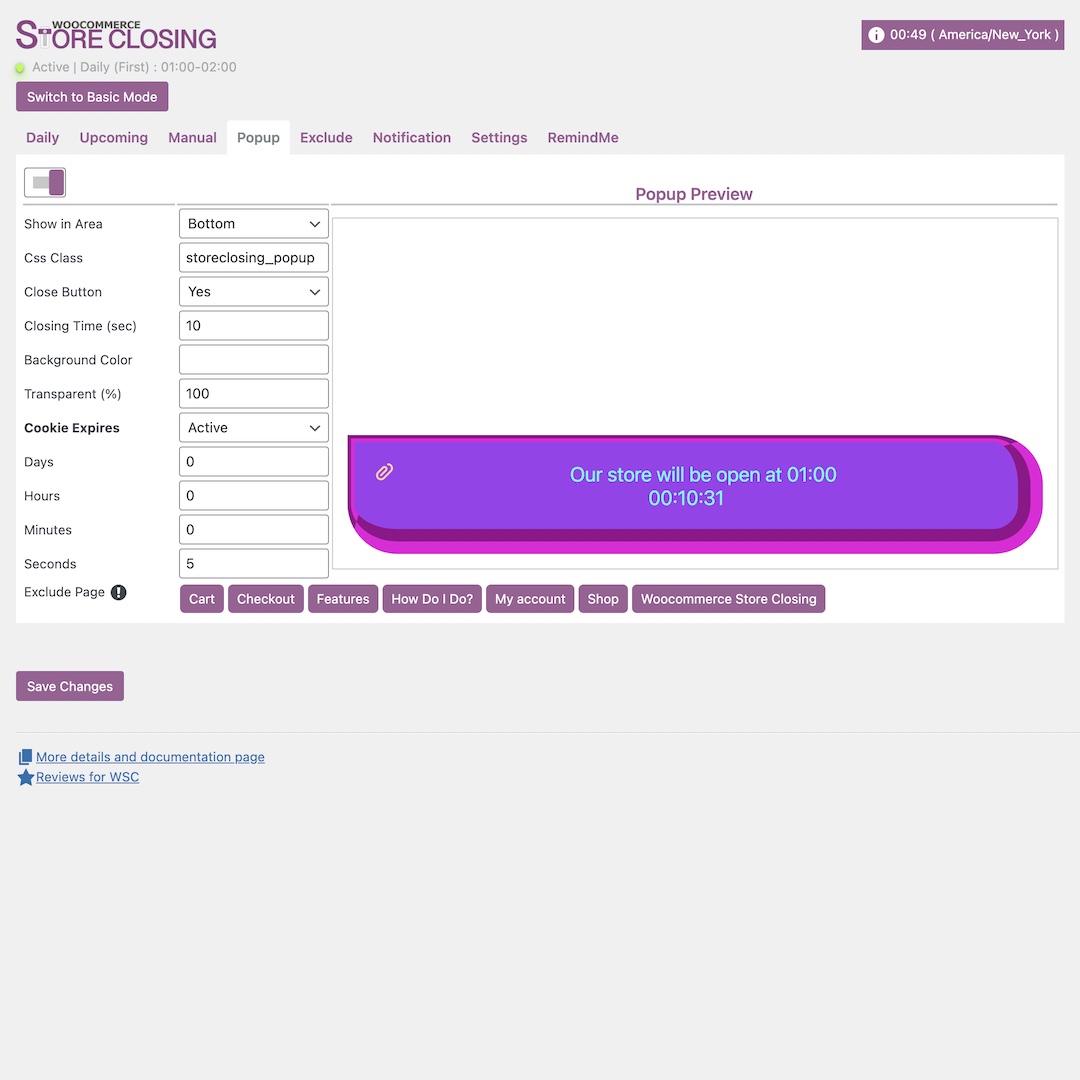
When you want something big to inform your customers about your store closing. You need a bigger option than the “add to cart” button. You can use the pop-up feature to inform your customers about your store closing.
Cookie option with timed setting can prevent opening the same pop-up over and over.
You can set an automatic time for the disappearance or manually close the pop-up.
You can exclude some pages from pop-up opening.
Exclude
You may want to keep selling some products even when your store is closed. Therefore, we added the Exclude category option to enable this. You can keep selling subscriptions, weekly orders or whatever you want even outside of your working hours. All you need to do is add these products to a category and select it as an “exclude category”. When you activate this, all products will be closed for orders except this category.
Also, we added a vice versa option for exclude setting. When you select “only close this category” check box, it will work as vice versa. Only selected category will be closed for orders and all other products will be open.
You can set background color and transparency to exclude messages. “Message” area is where you can notify your customers that this category is blocked for orders.
Quick Tips About Exclude
- Please check if “only close this category” is selected or not.
- Make sure to activate it and set 00 for all if you don’t want a time limit, this way it will work without checking time.
- You can use [plist] in the notification message, this will list unauthorized product(s).
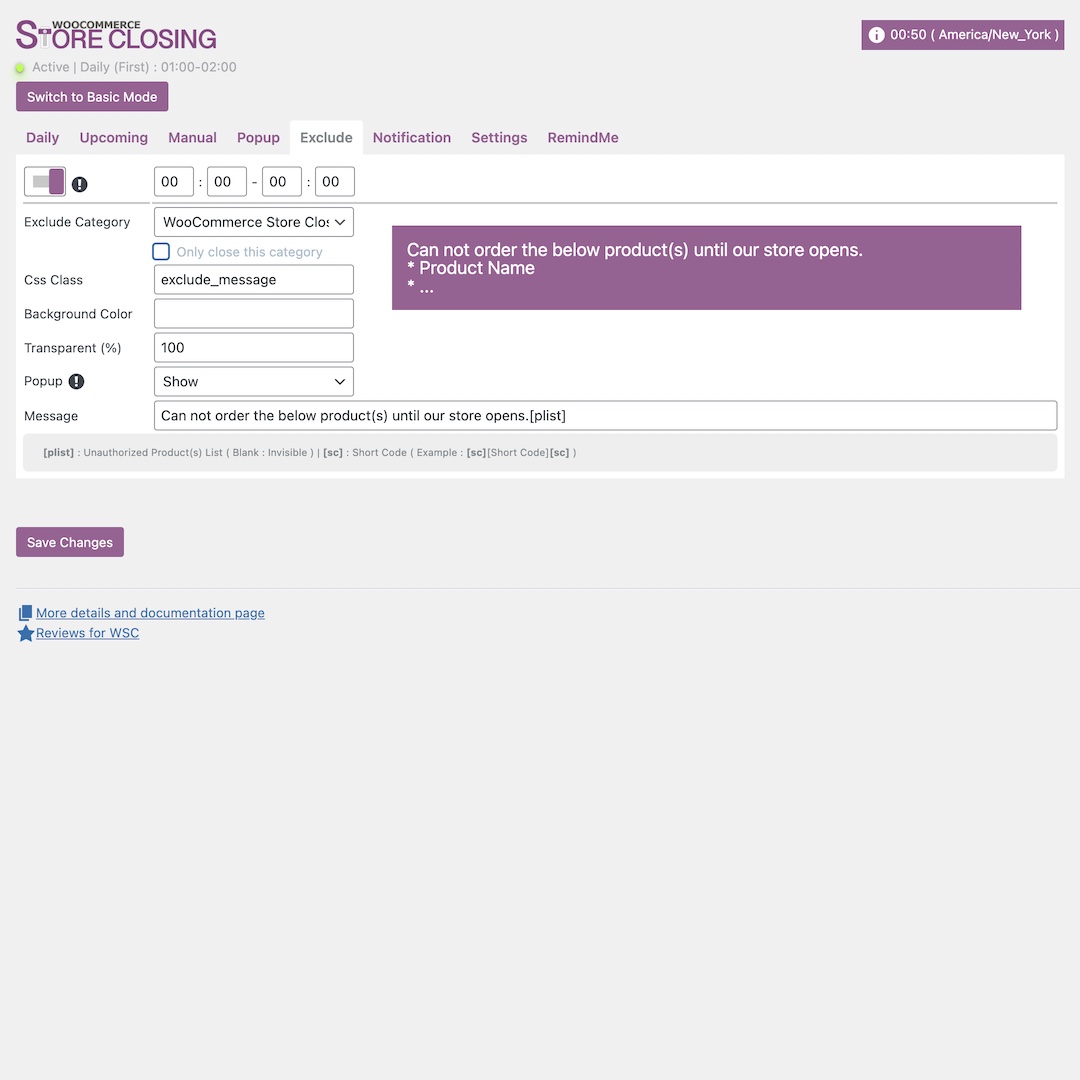
You can set a time limit for the exclude function; it can trigger by your selected times.
We check the cart before store closing, if a user has products from a closed category, order won’t be processed.
You can hide the pop-up for excluded category in cart and order pages.
There is a special notification for the exclude function, you can write a message if your customer has different products than excluded category in cart. Order won’t be processed, and this message will appear on the customer’s screen, you can write whatever you want.
Notifications
You can set all your notifications from this menu. “General Notification Message” works when there are no daily or upcoming notifications. “Dayparts Notification Message” area has three different options. You can split one day to three different parts and add messages for each time.
We also have hook options, you can set where to show your notifications on each page.
Quick tips About Notifications
- Always set a General Notification Message and test it with manual closing
- For hook options, try and check which ones are working fine on your website. We have a lot of options here and some themes may change hooks. One of them should work for you if defaults are not working, just test these settings.
- There are some smart tags for notifications;
-
- [tstamp] : This shows working hours as a weekly chart
- [pcstamp] : Displays the marked date and time in the closing notification
- [postamp] : Displays the marked date and time in the opening notification
- [countdown] : Adds the countdown for notification. (Doesn’t work on manually closing)
- [sc] Adds the shortcode for notification. Example : [sc][ShortCode][sc]
-
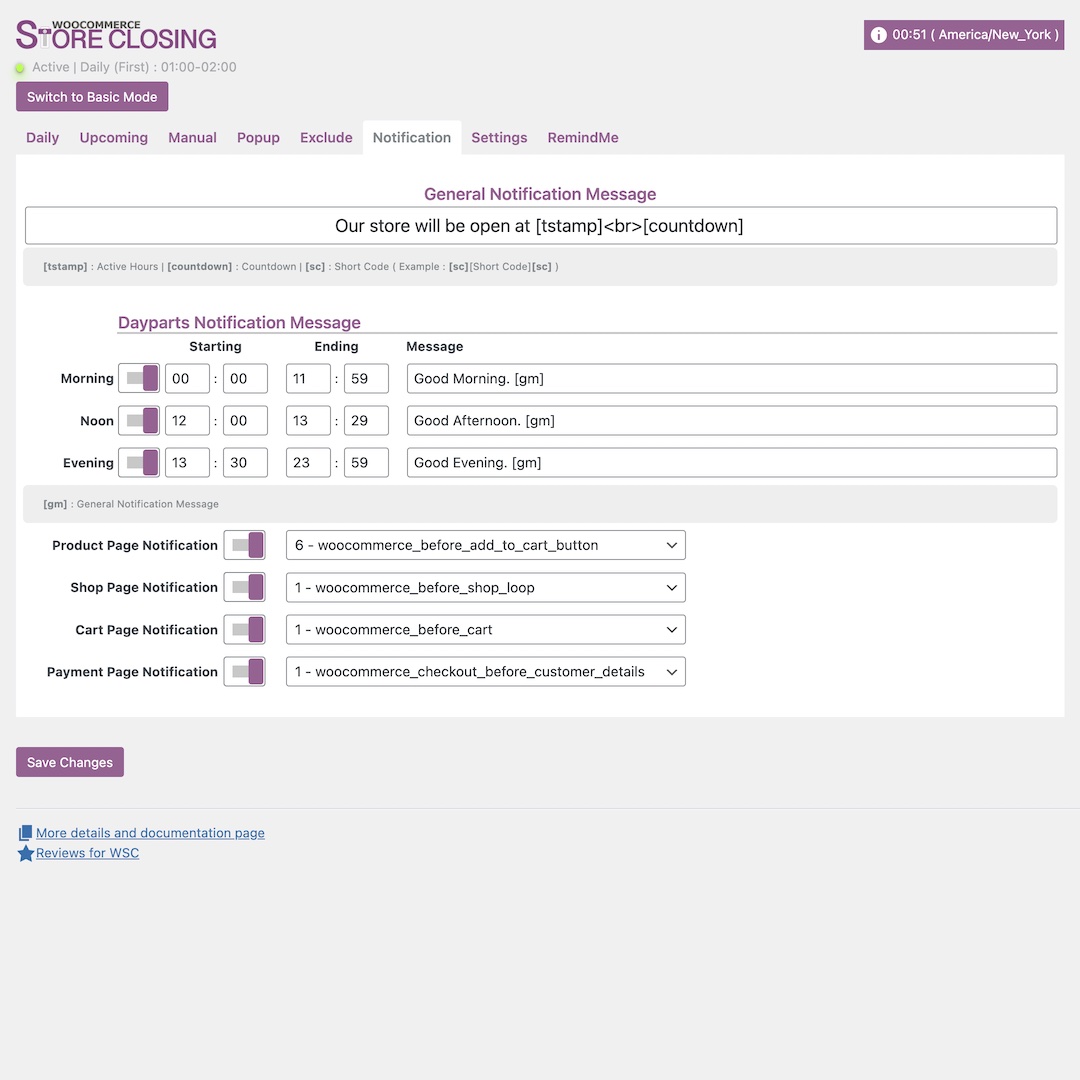
Smart notification messages. Smart tags on notification messages. (Active hours, countdown, short code etc.)
You can create different messages for day parts.
Defining WooCommerce hooks for notification message area. (Product, Shop, Cart, Order)
Settings
There are some tweaks about using our plugin. For example you may want to keep getting orders but only add a notification for working hours. “Action” area is where you decide “hide button & notification” or “only screen notification”. If you select only screen notification, you can still get orders but customers will see a notification. “Hide button & notification” is closing your store for orders.
You can select the “new order email” area to add your notifications to new order mails. With this setting, customers can see your notification messages in their order complete mails.
Also we have added a permission. “Role Permission” setting works directly with WordPress roles, so you can assign a role to open and close your store. For example you may add a store manager role in WordPress and give him rights to close and open the store from the admin panel.
We have added some CSS themes for the notification message area. You can use these pre-made themes or customize it for your own theme. Just set background, text, border and icon colors and save settings.
The “Disable CSS” feature allows users to customize the store closing process using CSS. When you activate, you can create your own code to customize the store closing CSS. When the feature is closed, the system will automatically utilize the standard ‘storeclosing-disable.css‘ file.
“Backup all settings now” button creates an internal backup in your server with the latest settings. When you click “Restore Last Backup” it reverts back to the latest backup data. Also you may want to start over with all settings, “Clear all data” button resets all settings to defaults.
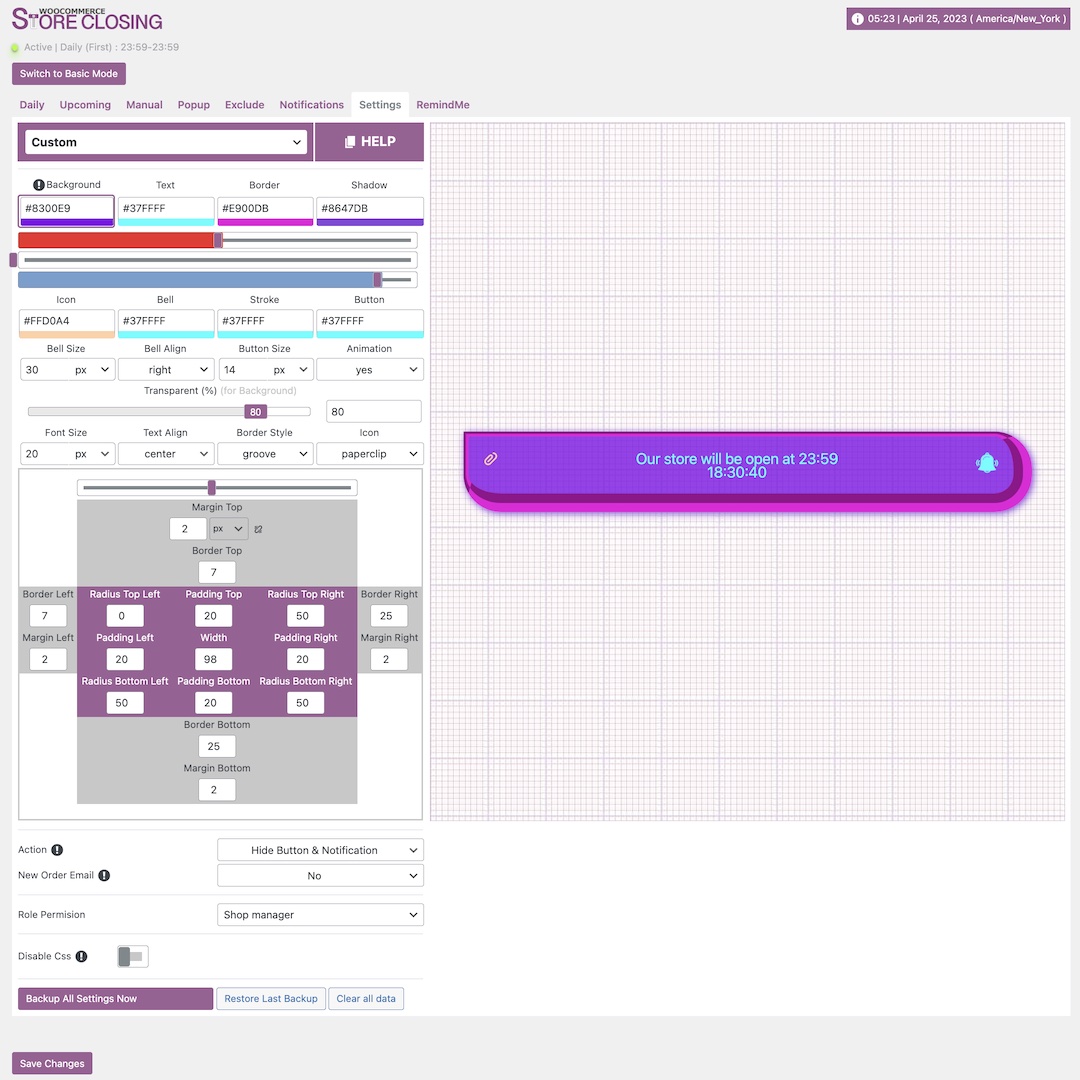
You may choose a role for store closing management. It is working with WordPress user roles.
Very detailed custom notification message appearance
We have some pre-made themes for notification messages, you can select one and change its settings for your preference.
Clear all data can create a fresh start
You may choose a position for the notification message for showing on the order email
Backup and Restore settings.
Preview active notification message
RemindMe: Customers who enter their email addresses into your notification area will receive an email from the RemindMe function when your store reopens
“Only Screen Notification” feature allows you to show only notification messages but keeps your store open for orders.
RemindMe
RemindMe is an independent and powerful plugin. The full version has a lot of features. Adds a nice-looking animated bell symbol to product pages. Customers can enter their email addresses and add a reminder. When a product comes into stock or the price drops, an email is automatically sent. You may customize anything for your site, including the bell view, email content, and more. You may view the list of emails and learn about their status, sent or not.
We enabled RemindMe as a function for the WooCommerce Store Closing plugin with version 9.8.0. Customers who enter their email addresses into your notification area will receive an email from the RemindMe function when your store reopens.
All messages in the RemindMe plugin may be customized in the options tab. At the settings tab, you may edit the contents, sender email, and sender name and monitor the email status.
Quick tips About SMTP
- Make sure your WordPress system has an active SMTP mailer; this will assist your emails in getting into your clients’ inboxes.
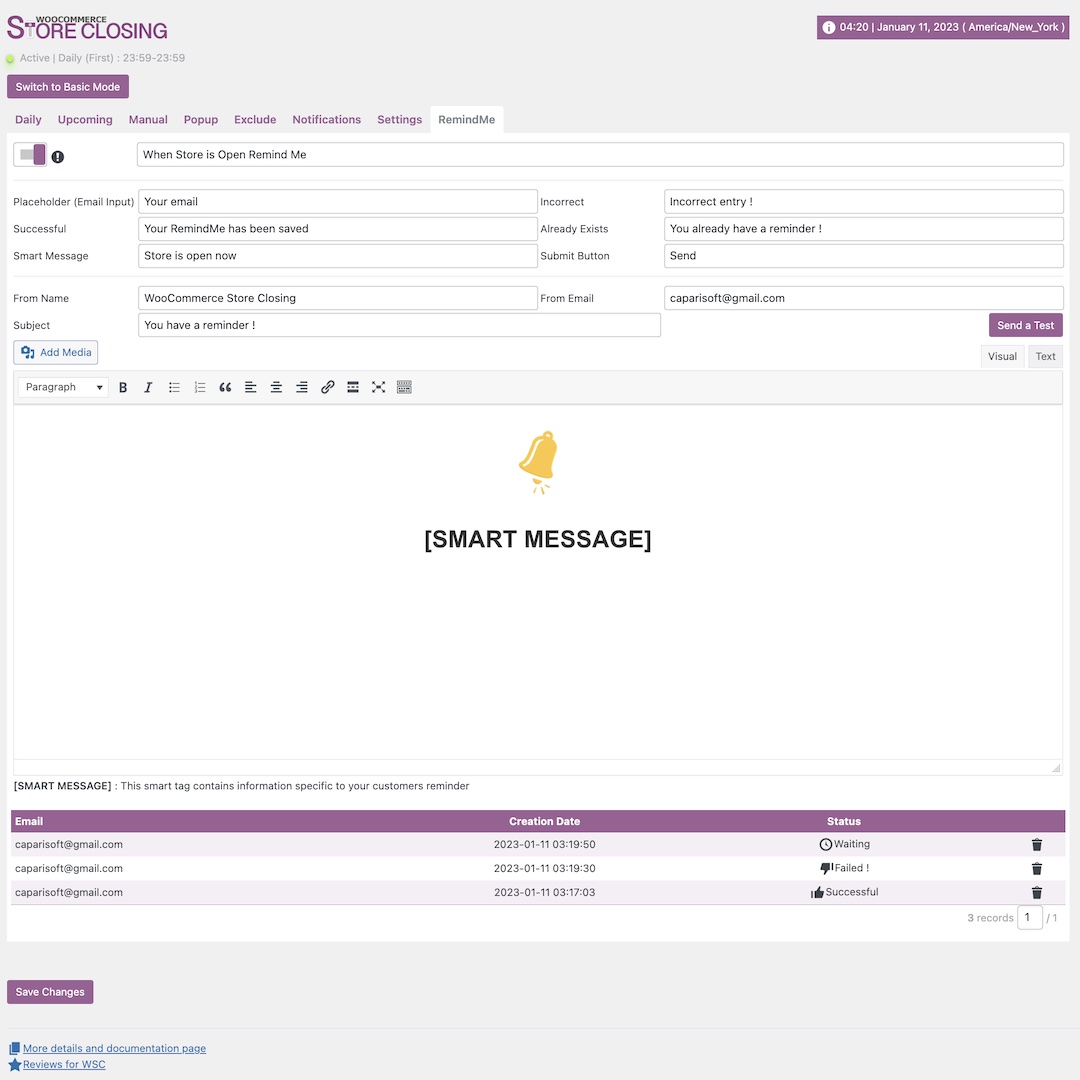
Customers who enter their email addresses into your notification area will receive an email from the RemindMe function when your store reopens
You can edit notification messages
You can edit format for reminder email
You can list the sender names and monitor the email status.
Which language support is available ?
Full language support is available. English and Turkish language support is included in the package. If you help me, I can translate in your language with a little text.
ShortCodes
There are many ways to use shortcodes in WordPress. Please check this guide for how to use ShortCodes in WordPress; https://www.wpbeginner.com/wp-tutorials/how-to-add-a-shortcode-in-wordpress/
We have created some shortcodes, you can use them wherever you want. Just make sure to set all your daily and upcoming settings, otherwise shortcodes won’t have anything to show. You must write shortcut tags between this [ ]
-
-
- Standard Usage : StoreClosing
(The nearest active notification is shown) - For Upcoming Table : StoreClosing Upcoming
- For Upcoming Closing : StoreClosing Closing
- For Upcoming Opening : StoreClosing Opening
- For Both of Daily Table : StoreClosing Daily
- For First Daily Table : StoreClosing DailyFirst
- For Second Daily Table : StoreClosing DailySecond
- For Third Daily Table : StoreClosing DailyThird
- For Timeline : StoreClosing TimeLine
- Standard Usage : StoreClosing
-
ChangeLog
9.8.5
- Compatibility: WooCommerce HPOS (High-performance order storage)
- New: Added BCC (Blind carbon copy) to email-sending format [RemindMe]
- Compatibility: WordPress 6.7x
- Compatibility: WooCommerce 9.6x
9.8.4
- Compatibility: WordPress 6.4x
- Compatibility: WooCommerce 8.2x
9.8.3
- Fix: The issue with excluding categories
- Compatibility: WooCommerce 7.9x
9.8.2
- New: Added custom disable-css option on the setting tab
- Compatibility: WooCommerce 7.8x
9.8.1
- Fix: Mobile theme for RemindMe Tab
- Update: Improved performance
- Update: Added RemindMe setting data to Backup&Restore functions
- Compatibility: WordPress 6.2x
- Compatibility: WooCommerce 7.5x
9.8.0
- New Added RemindMe tab (more details)
- Compatibility: WordPress 6.1x
- Compatibility: WooCommerce 7.2x
9.7.9
- Fix : Future date indicator that will be active on the last day of the week
- Compatibility : WordPress 6.0x
9.7.8
- Compatibility : WordPress 6.0x
- Compatibility : WooCommerce 6.9x
9.7.7
- New : Manual Button
- New : Logo
- Fix : Improving settings for the first installation
- Compatibility : WooCommerce 6.5x
9.7.6
- New : Dashboard info modul with Manual Button
- New : Auto Setup for Daily Tab
- New : ShortCodes (Added TimeLine)
- New : Timeline for Daily Tab
- New : Improved performance
- Compatibility : WooCommerce 6.3x
9.7.5
- Fix : Notice of Accessing static property
- Update : Exclude category method
- New : Show all categories out of the selected category on the Exclude Category Tab.
- Exclude Tab -> Only close this category
- Compatibility : WooCommerce 6.1x
- Compatibility : WordPress 5.9x
9.7.4
- New : Improved the function of escaping the caching plugins
- New : Popup message show/hide when the product is excluded by category
- Compatibility : WooCommerce 5.9x
- Compatibility : WordPress 5.8x
9.7.3
- New : Basic/Advanced Admin Panel
- Compatibility : WooCommerce 4.5x
- Compatibility : WordPress 5.5x
9.7.2
- Fix: The blocking of order elements in the backend has been stopped
- New: Improved performance
- Compatibility: WooCommerce 4.4x
- Compatibility: WordPress 5.5x
9.7.1
- New: Third opening and closing time for the day
- Daily Tab -> Third Settings -> Click Show button
- Compatibility : WordPress 5.4x
- Compatibility : WooCommerce 4.1x
9.7.0
- New : Settings Tab ( ! Requires settings to be reconfigured. )
- Update : Added checking whether the jQuery libraries already exist/loaded in the site for performance improvement
- Update : Improved admin.css for WordPress 5.4x
...
9.6.9
* Compatibility : WordPress 5.3x
* Compatibility : WooCommerce 4.0x
9.6.8
*** !CAUTION:It may cause a reset in STORE CLOSING’ settings ***
* New : Action -> Only Screen Notification.
+ Settings tab -> Action
+ If you select ‘Only Notification’, your customer can order your products from your store during the notification message is shown.
* New : New Order Email notification.
+ Settings tab -> New Order Email
+ If you select one area, adds the notification message to ‘WooCommerce New Order Email.
* Fix : Improved admin.css for WordPress 5.3.
* Test Up : WordPress 5.3x
* Test Up : WooCommerce 3.8x
9.6.7
* Fix : Show Message issue on Upcoming Plan.
9.6.6
* New : Use shortcode on the notification messages
+ It is possible on the daily message, the general notification message and the dayparts notification message.
* Compatibility : WordPress 5.2x
* Compatibility : WooCommerce 3.8x
9.6.5
* Update : “popup message div” (storeclosing_popup_main) moved to wp_footer (from the wp_header) field.
+ There was a problem not showing favicon in some systems
* Compatibility : WordPress 5.2x
* Compatibility : WooCommerce 3.7x
9.6.4
* New : Select hook for notification
+ Notification tab -> Product Page Notification …
* New : Show notification message on the cart page
+ Notification tab -> Cart Page Notification
* New : Time limitation for exclude
+ Exclude tab -> You can set start and end times for exclude process.
* Update : Moved the selection of notifications on the Settings tab to Notification tab.
+ Notification tab -> Product Page Notification …
* New : Shows the “add to cart” button when the countdown time runs out.
9.6.3
* New : Checks selected category with together it’s parent category.
+ Exclude tab -> Exclude Category
9.6.2
* New : Delete Cookie
+ Popup tab -> Cookie Expires : Active / Pasive
* Update : Removed “Check if WooCommerce is active”
9.6.1
* Fix : General Notification
+ Fix notification message : Deleted text ‘Store is Close’ (when set manual)
* New : Tested up to :
+ WordPress 5.0.x
+ WooCommerce 3.5.x
9.6.0
* New : Notification tab
+ Dayparts Notification Message (Morning, Noon, Afternoon)
* New : Clear All Data
+ Settings tab -> Clear all data button
* New : Exclude page for popup
+ Popup tab -> Exclude Page
9.5.9
* New : Backup All Settings
* Fix : General message link on the manual tab
9.5.8
* New : Improved performance
* Fix : Jquery activaiton issue
* Fix : Active Plan Date Format (WP Default)
9.5.7
* Fix : Blank setting page issue
* Fix : Image display issue (Https)
9.5.6
* New : Dashboard Info
* New : WooCommerce RemindMe Relation
9.5.5
* New : Exclude Category
9.5.4
* New : Popup Notification
9.5.3
* New : WooCommerce compatibility 3.x
* Development – Affected classes
* Fix – ShortCode issues
9.5.2
* New – Theme
* New – Multiple ‘Upcoming’ settings
9.5.1
* New – Activated on Shop Page
* Fix – CountDown issues : (JS Local Time)
9.5.0
* New – Admin Panel
* Fix – 00:00 time issues
9.4.0
* New – Manuel Store Closing
* Fix – Timezone issues
* Fix – CountDown issues
* Fix – Notification issues
9.3.3
* Fix – CountDown Language issues
9.3.2
* New – New Role Permision
* New – New language : Brazilian Portuguese
9.3.1
* Fix – Default database issues
* Fix – Empty Notification issues
9.3.0
* New – Countdown : Smart Tag [countdown]
* New – Daily dual opening closing.
* New – ShortCode
* Fix – Text Domain issues
9.2.0
* New – ShortCode
9.1.1
* Fix – Text Domain issue
* Fix – Notification custom css issue
9.1.0
* New – Admin Panel
* New – Daily Notification Message
* New – Custom Notification Message
9.0.0
* Initial Release
Feedbacks are also very important for us.
We have fast and effective support for our plugin and our team is checking the latest versions of WooCommerce and WordPress on day one and responding to these changes quickly. We stick with WordPress and WooCommerce defaults, which makes our updates very fast, compatibility is almost %100 with the latest version every time. We’re always up to date and working. Feedbacks are also very important for us. We are improving our code with customer feedback and adding lots of new features with popular requests.
